Wednesday, December 22, 2010

Tuesday, December 21, 2010

Sephora Precision sponge..a beauty blender dupe?

Hey chicas!

Hope your keeping well and dolling up for the festive season. I am trying so hard to sit down and record some Christmas look videos but I'm so busy with an Indian bride at the moment. I will try to get at least 2 tutorials up in time for the 25th.

The other day i was browsing in Sephora and found a cute little yellow egg shaped sponge freakishly similar to the beauty blender sponge. 

I thought, for 50dhs (circa 13 USD) was a pretty good price to pay if it works the same as the beauty blender which retails around 20USD. 
I ended up buying it and tried it with my Studio fix fluid foundation and also my RCMA cream foundation.
The verdict? Its much denser and stiffer then the beauty blender and a lot smaller in size and does not expand like the former. 
It does however apply liquid foundation beautifully. It doesn't quite bounce the same but if you sort of dab it in it works really well to blend the foundation to a lovely airbrush finish.
I would definitely buy more of these if only they weren't such a pain to clean!
They stain, therefore however much you try to wash it, it will stain. So unfortunately I will use them on myself but not on clients as they look dirty. 
Sadly, I prefer the beauty blender, but this isn't a bad dupe for personal use. I think it works better with liquid foundations rather then cream due to the lack of "bounce".
Would I buy it again? Yes..if I figured how to get rid of the stains.

Anyway , thanks for stopping by and let me know if you tried it and what you think?
Ciao bellas!
xxx




Sunday, December 19, 2010

Update and Product Review

Oh my god! Its been ages since I updated my blog. I have been absolutely CRAZY busy with work. I also went away for my birthday to Lebanon..amazing trip I will blog a bit about that later.
I am planning on doing lots of tutorials during the holidays so stay tuned...
In the meantime a quick review on a new foundation iv been using...


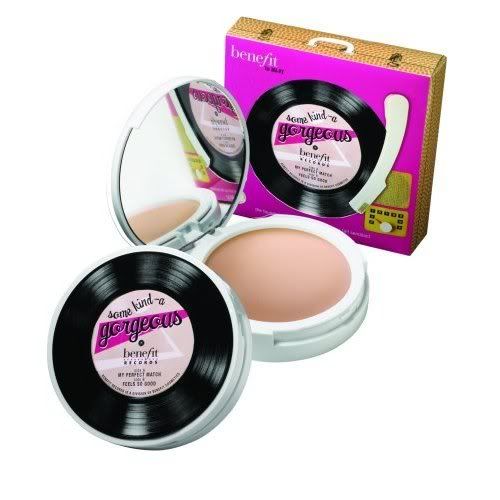
Benefit Some kinda Gorgeous foundation faker!

I picked this up the other day in a little gift set which came with Bad Gal lash and Coralista blush (which is absolutely gorgeous by the way) and i decided i would try out this foundation.

Okay so at first its not an actual foundation. Its more of a tinted moisturizer with a light -med coverage. It is very silky and liquid but dries to a complete powder matte finish. I really like it. Its light and airy and great if you don't like too much coverage and want to look as natural as possible (like me ).
I wouldn't recommend it to anyone who wants or needs coverage but you can simply go over blemishes with a concealer. I believe that foundation is not for coverage its for evening out skin tone, and concealer is to be dotted where needed for that beautiful flawless look.

Anyway, it comes in 3 shades which isn't great but kind of works somehow. I'm not sure the darkest shade would work for women of color because it might turn ashy.
I do like this very much and i feel as its long lasting as well.
Try it out! I got the one in medium.

Cheers!
Ciao Bellas!
xxx

Wednesday, November 24, 2010

The History of makeup kits

Hey guys,
I stumbled upon this amazing website that has pictures of old makeup kits..some of these are from the 1900s  which is pretty cool to see... enjoy!


1900 Stage makeup kit, probably for a white male.

 Complete professional actor's kit in it's original tin box, most probably used by a white male in the early 20th century.


Complete and unused white female Max Factor theatrical "student" kit in original box (1940's?)
This one has fake stage money in it...circa 1920s
This one probably belonged to a male actor 
various cream eyeshadow, or greasepaints


I hope you guys enjoyed this. I find it fascinating to learn about what they used to use back in the day for stage and film, but the best is when you actually get to see it for yourself. To me these are relics :) 

Until next time!
Ciao Bellas!


Tuesday, November 23, 2010

How to choose the correct foundation

When it comes to choosing the correct foundation, many people think they know how to but they actually make some common mistakes. Unless you have studied makeup or are a makeup junky, its most likely you do not know how to correctly match your own foundation. 
I have compiled a couple of pointers for you to follow when you go out on the search for a foundation. I know this is a long post, but it covers all you need to know about foundation application. Remember, if your foundations is not right, the rest of your makeup will suffer. 


  1. To start off, you must identify your skin type. Is your skin dry, oily, combination or normal? This is very important when choosing a foundation because nowadays there are foundations to match skin types. This is important if you want a foundation that will suit your skin type. Imagine if your skin is dry and you get a foundation for oily skin..you will end up with even drier skin!Why? Because the one for oily skin is designed to prevent shine and will mattify. Get it? :)
  2. Identify your skin tone/ethnicity. This is important. You need to know what undertone your skin has. Most ethnicities are of a yellow undertone. Fairer skins usually have a more pinkish or warmer undertone. Once you have determined this, you can correctly choose the color of foundation. I prefer using yellow undertones because they are more naturally found in the skin. If you are fair, your skin usually looks more pink. To tone this down, a yellow based foundation is best. Once you have determined your undertone, you can proceed with a dark or light or anything in between which fits you.
  3. Decide what texture and finish you want. When you know what colour is best for you, you now need to decide what type of finish you want. There are many different finishes and textures now out on the market
Finishes
  • Matte- no shine finish, usually looks very flat and is best for oilier skins. Normally it gives the most coverage. This is best used in photography or on film/tv
  • Satin- a semi matte finish but still shows some skin. Its good for most skin types if you want that natural look but with coverage.
  • Glow- this was made famous by Jennifer Lopez, the J lo glow. Its usually a satin finish but with a more natural finish that captures light and gives you a healthy radiant look. Perfect for the summer months.
  • Shimmer- this is normally a high shine foundation look best kept for fashion/editorials. Its got a shine shimmer pigment in it and if you have oily skin, it will enhance all your pores and you will look like a disco ball 
  • Tint- the sheerest of them all, usually in a tinted moisturizer. Its extremely light and just evens out the skin tone giving you an even finish but no coverage. Best for normal clear skin that don't need coverage
Textures


  • Liquid- the most popular. From really sheer to full coverage. 
  • Cream- the highest amount of pigment, therefore has the most coverage. Good for photography/film and drier skins
  • Cream to powder- relatively newer on the market. It has a creamy consistency, but dries to a powder finish. Great for combination skins 
  • Powders- these are powder foundations. 2 in 1 where it does everything in one application. It gives coverage and sets. Usually good for everyday use and is great for oily skins. If you have a drier skin, you may not like this. 
      4. Decide the amount of coverage you want. Do you want a sheer one? A full coverage? A medium natural coverage? Or maybe just a tint? This can be determined by identifying whether you need to cover any blemishes, discoloration or if you want a heavier look.

  • Always match your foundation to the rest of your body. The most common mistake is matching it to your face or the neck. The neck is the lightest part of your body because it doesn't catch any sunlight therefore remains much lighter then everywhere else. 
  • When you match a foundation and it completely disappears into the skin, it means its the right color for you.
  • Foundation is supposed to be your second skin. It must not be obvious. If it is, it defeats the purpose. 
  • If you need to conceal any blemishes or discolorations, use a concealer after you apply foundation. This way you wont cake it on!
  • Remember, if you need to take photographs, be wary of foundations with too much spf. The titanium dioxide will reflect the flash in the cameras and give you a ghost white face!
  • Always blend it to perfection! There is nothing worse then seeing foundation streaks and marks where it hasn't been blended in!
  • Use a brush to apply it. If you use a sponge, make sure to wet it, this will prevent it from absorbing all the product in it and wasting it.
  • If you choose to apply it with your fingers, please make sure you wash your hands to prevent from spreading germs onto your skin. Using fingers can be amazing due to the heat production from skin to skin. Great for blending it in to a natural finish.
  • Always set with a light dusting of powder to keep the foundation in place all day. 

Hope this helps and if you have any further questions, send me a message and i will do my best to answer them!

Ciao bellas!
xoxo

My top 10 neutral MAC eyeshadows!

Hello everyone!


So the other day at a shoot, I was sitting in between touch ups and had a thought...what if I didn't have any mac eyeshadow? What would I do without my favorite ones? Scary thought. So that inspired me to write a list of the ones I cannot live without that I reach for all the time. These are mainly from my neutral palette, because mac does the best (in my opinion) hehe :) Enjoy!


Satin Taupe
Taupe with silver shimmer(Frost) 
Gorgeous all over the eyelid and goes with anything. Great for a soft smoky eye. I love it on brown and blue eyes.


Cork
Muted golden brown (satin)
Perfect to fill in brows and to lightly contour the crease


Sketch
Burgundy with red shimmer (velvet)
Beautiful shade to contour the outer eyelid and as an all over smoky colour. Makes green eyes pop!


Espresso
Muted golden brown (matte)
The perfect shade for filling in brows,contouring the crease 
and as a neutral shade for pretty much anything!


Brule
soft creamy beige(satin)
The best for all over base or a natural highlight under the brow


Woodwinked
warm antique gold (veluxe pearl)
My all time favorite bronze gold goes on anyone, but especially on blue eyes, really makes them pop!


Bronze
Gold brown with gold bronze shimmer (frost)
Truly the best true bronze. Perfect for weddings,natural smoky eyes and day makeup.This is really pops on green/blue eyes


Mulch
red brown with bronze pearl (velvet)
Love this gorgeous red brown for a warm smoky eye or just anything really. Such a versatile brown


Patina
Taupe brown with golden pearl (frost)
One of my all time favorite mac eyeshadow that i cannot replace anywhere else. A soft gold with a slight taupe tint. Such a unique color


Club
red brown with green pearl (satin)
This is a fantastic unique color. Depending on the base you use can either look green or brown. Duo Chrome love it love it love it !


There are many more that I love but these are the ones I always reach out for. I do love many other brands as well. I will do some more top favorites in the next coming posts. What are your favorite mac eyeshadows?


Ciao bellas!
xoxo

Monday, November 22, 2010

Update!

Hey guys!
This is going to be a short and sweet update. I am sorry iv been away, but had the opportunity to work on the set of the still in production Mission Impossible 4 movie installment assisting the makeup department. It was a fantastic 3 days and i had such a blast! Tom Cruise is pretty awesome! Now i'm sick with the flu so wont be doing much until i get better! No one wants to see sniffy red nosed alessia making makeup tutorials haha!


Stay tuned though i have some amazing videos coming up...
Ciao bellas!
xoxo

LinkWithin

Related Posts Plugin for WordPress, Blogger...